Friday, December 23, 2022

Random Realm: Ruins and Lairs

“Once you’ve set down the population centers, you can begin placing the Ruins locations. These Ruins represent lost cities, crumbled fortresses, stygian dungeon, plundered temples, abandoned towers of wizardry, and all the other decaying locales so beloved of adventurers.”

--An Echo Resounding: A Sourcebook for Lordship and War
Kevin Crawford (2012)

Step 11: Add Ruins

In our last installment, we added two major cities to our random map as well as a handful of towns. Now we’re going to place some potential adventure locations in the form of what Crawford calls “Ruins.” The book suggests the following:

  • 5 ruins for every City.
  • 1-3 of those were once major human cities, towns, etc.
  • The rest can be whatever (wizards' towers, lost temples, ancient ruins, etc.)

Since we placed 2 Cities in a previous step, we need to place about 10 Ruins. According to Echoes, 2-6 of these should be former human settlements of some kind. I’m trying to lean into randomness whenever possible and let the dice decide these sorts of things for me. So, I roll 1d6 and get a 6. Let’s represent those 6 ruins with some bright pink dots. 


The remaining 4 ruins are the miscellaneous type referenced above. These we’ll note with bright yellow dots. 


At this point, I still don’t know what these “ruins” represent, exactly. I’m not going to replace them with new symbols just yet. Until I know their nature, I don’t know if they’ll warrant a prominent map feature or just a note. For now, I’ll leave them as dots on a separate lair in my GIMP image file.

Step 11.5: Add a Map Grid 

If I’m going to add features to the map that won’t necessarily get their own symbols, then I’ll need a way to keep track of where I put those features. Before I go too much further, I think I’ll add a quick and dirty grid labeling system to my map.

Now, a lot of old school maps put the grid labels right on the hexes themselves. I personally don’t care for that, as it makes things too cluttered and hinders the visibility, and therefore the usefulness, of the map itself. Instead, I’ll just label the rows and columns. Given the nature of the hex map, the row labels won’t match up perfectly. That’s fine. An approximation will be okay for our purposes.

Take a look at the map above to see what I mean. The area I’ve circled in pink is between two of the row labels. It could be expressed as E1 or E2. When mapping locations, if a hex falls between the labeled rows like this, I’m going to choose the northmost row. In this case, that makes this hex E2. It’s not completely precise, but it will work well enough for our purposes

Step 12: Add Lairs

In An Echo Resounding, the next step is technically “establish resources”. That step is tied-in with the author’s realm management system, which we’re not really going to worry about for this exercise. Instead, we’re going to skip right to “placing Lairs.”

Lairs are sort of reverse-towns. They are the havens for the monsters, bandits, and other hostiles in the area, and inherently hostile to player characters. To use the old school paradigm of D&D adventure progression, Ruins are for Dungeon exploration and Lairs represent Wilderness play.

For Lairs, I'm using gray squares. Adding them according to the advice in Echo, here's what the end result.


Next Time

We'll take a break for the mapping in order to make some decisions about the campaign itself.


Random Realm: Adding Settlements

Now that we have most of our natural features established on our map and we’ve taken stock of the scale and overall size of the campaign area, we need to add some settlements. Dwarf Fortress is no longer any help to us, as the starting map it generated didn’t contain any cities or settlements. Note that the program could have generated a whole civilization for us, complete with history and such. However, the result wouldn’t have been very useful for our needs. Anything produced by Dwarf Fortress ends up being pretty specific to the nuances of that game and its setting.

It would be helpful to have some kind of guidance going forward, however. For that help, I’m turning to the first of our specific tabletop-related resources: An Echo Resounding, by Kevin Crawford. While partially a book on domain management and mass combat written for Labyrinth Lord, Echo also contains great guidance on building a D&D-style campaign using a sort of top-down approach, which is what we're interested in. I’m going to be following its advice through this step and possibly beyond.

Step 9: Placing Cities

To quote Crawford (2012) “Not every village and tribal campsite needs to be qualified as a location…At this stage, you are concerned only with the major City and market Town locations of your region” (p. 10). Crawford (2012) recommends placing a City “along rivers, or along seacoasts where a river empties into the ocean” (p. 10).

I’m not going to directly quote Echo any further, but here’s a summary of the advice it offers:

  • A relatively unsettled region (which is good for D&D gaming) should only have about 1 proper “city”.
  • Cities need a lot of surrounding farmland to support them (and about 10x as many farmer-peasants as city dwellers).
  • Cities usually develop near water.
  • A city on the edge of civilization should have a population of about 10,000 – 15,000.
  • Cities should be far away from one another.

Looking at my map, I decided to bend the rules above a bit and place 2 cities. The map we have is divided into north and south regions by those mountains near the center. I think a mountain range forms a nice border and gives justification for perhaps two separate cultures existing here: one to the north, one to the south. 

Remember, too, that our campaign map is a cropped version of a much larger map. There is plenty of land north and south of where we’ve arbitrarily decided to zoom in for our project. Perhaps our map represents the relatively unsettled borderland between two more developed nations who are slowly encroaching upon this unsettled wilderland.

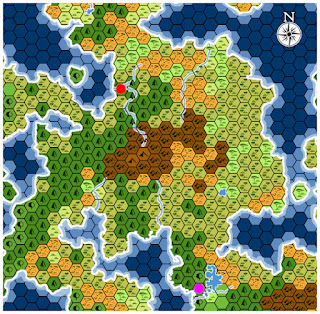
With that in mind, I added two dots to represent two large cities, a red dot to the north and a purple dot to the south.

Red Dot: This city is in a coniferous forest hex, where two rivers connect and flow to the sea. One river flows from the mountains, bringing potential mineral wealth. The presence of a lot of forest implies fertile land, which I imagine could be converted into farmland near the river. I’m not knowledgeable enough about agriculture to know whether the presence of the sea near that scrubland helps or hinders things. But I think this region is believable enough for a city to meet our needs.

Purple Dot: Probably a better location than the northern city, this location is on a river, along a coast, near a large lake, and surrounded by forest and adjacent to grasslands. There are some badlands to the northeast, but the region here seems pretty hospitable.

Step 10: Placing Towns

Crawford recommends placing four towns per city on the map, spread out fairly evenly along coasts, rivers, or in any particularly blank spots on the map. I’ve done that here, keeping to the color schemes of red toward the north and purple in the south. At this point, those colors denote some kind of cultural connection or affiliation, but I’m not yet sure what.


And here’s a version where I’ve replaced the bright dots with more appropriate map symbols. Large black dots ringed in white for cities. Smaller white dots ringed in black for towns.

Up Next

We'll add potential adventure sites to our map.

Random Realm: The Map So Far

WThis post is part of a continuing project to turn a map generated via the PC game Dwarf Fortress into a usable map for an RPG Campaign. At this point, we have a nice-looking hex map fleshed out with terrain and natural features. I wanted to take a break to look at what setting details we have so far.

Setting Details

At this point, we haven’t determined much about our setting. However, we do have SOME detail established. Before we move on to adding settlements, let’s take stock of what we know about our campaign


Terrain

Our map includes hexes that correspond with the following types of terrain:

  • Mountains
  • Forest, Evergreen
  • Forest, Deciduous
  • Savanna
  • Shrubland
  • Badlands
  • Grassland

Scale and Terrain

We also know a little bit about the area of our campaign and the map itself.

  • Hex Size: I build this using a 6-mile hex scale.
  • Number of Hexes: 30 hexes wide X 26 hexes high.
  • Total Area: 24,180 miles. The math here is 1 hex = 31 miles, 780 hexes (30 x 26), 780 * 31 = 24,180.
  • Rivers: 6 major rivers visible. 1 major river partially visible (in the extreme north of the map).
  • Lakes: 4 major lakes, with 3 of the 4 in a cluster near the south of the map.
  • Mountain Ranges: 2 major ranges, with the southernmost range only partially visible.

Sunday, December 18, 2022

Target 20 (Variant) for Swords & Wizardry

This post is inspired by my current Swords & Wizardry campaign.

One of the features of Swords & Wizardry Complete is that it features both the traditional descending Armor Class of pre-2000 D&D as well as the more modern, ascending armor class of 3E and subsequent editions. This allows a S&W GM to choose whichever system they want to use in their home campaign.

I’d like to offer a third variant, one that uses classical descending AC without having to rely on to-hit tables: Swords & Wizardry Target 20.

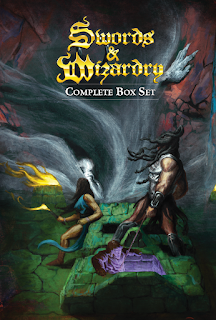
Swords & Wizardry Complete Boxed Set
First introduced by Delta’s D&D Hotspot, Target 20 is a means to replace attack charts with an easy-to-remember system that uses math even an English major such as myself can easily do in my head. Delta explains the reasoning behind the system in a great blog post here (seriously, check it out, it’s worth reading). He uses Target 20 not just for attack rolls, but for saving throws and thief skills as well.

For our purposes, we’re going to use it to as a replacement for to-hit charts when using descending AC in Swords & Wizardry.

S&W Target 20

When a player makes an attack roll, they add a bonus “to-hit” based on their character’s class and level, and add the target’s AC as an additional bonus. If the total is at least 20, the attack hits.

Let’s look at a pair of examples, using both systems:

Standard Rules: A 1st-level fighter with a +1 strength bonus is attacking a kobold with an AC 7[12]. According to the attack table on page 38 of Swords & Wizardry complete, the fighter needs a 12 to hit. The player rolls an 11 and adds their +1 strength bonus, bringing the total to 12. A hit!

Target 20: A 1st-level fighter under this system gains a +1 “to-hit” bonus based on class and level (see below). They also gain the +1 strength bonus as above. The player once again rolls an 11 and adds +2 (+1 class bonus, +1 strength bonus), for a total of 13. The player also adds the kobold’s descending AC of 7, for a total of 20. Since the total is at least 20, it’s also a hit.

Note that either player would have missed had they rolled a 10 or less. In other words, the math between the two systems is identical.

Full Rules

Here's the full rules, including Target 20 to-hit bonuses for all PC classes, as a one-page document and as a version that's the perfect size to print out as a bookmark.


Saturday, December 17, 2022

Random Realm: Final Touches to Base Map

Random Realm: Final Map Touches

I’ve been working on converting a procedurally generated map (created via Dwarf Fortress) into an RPG campaign map. I’m just about ready to start adding actual gaming content to this map and using it to build a small RPG setting. But first, I needed to make some aesthetic improvements to the map.

Step 6: Coasts and Outlines

I used a built-in feature of Worldographer to automatically generate coastlines. Then, using GIMP, I outlined everything first in black, then in white, then finally in a lighter shade of grey.


Step 7: Add Rivers and Lakes

At this point, the only features from the original cropped DF map missing on my Worldographer recreation were water features: lakes and rivers. Now, if you look at the prettier map I autogenerated from the DF map, you can see lots and lots of rivers, crisscrossing the land.


That’s pretty realistic, but most maps don’t show that level of detail, instead focusing only on major water features. For gaming purposes, I think we can follow this route as well. To find the major water features, we again turn to our original cropped DF map.


Those blue curvy lines inside the continent represent major rivers. The blue ~ symbols are lakes. When drawing in my own rivers and lakes, I tried to keep them to the general areas and shapes presented in that map, but I wasn’t slavishly devoted to their exact placement. I also tried to make my rivers flow as rivers do in real life: downhill. Dwarf Fortress will already have taken that into account, of course, but the exact flow of those ASCII rivers isn’t exactly the most clear thing on that map, and so I had to make some decisions as I went.


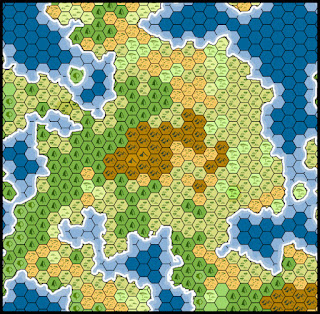
Here is my map with all water features drawn in and highlighted in white (for greater visibility).


One final note about this image: The image above involves a lot of small tweaks in GIMP to clean up mistakes, color in tiles that were split between two hex colors, etc. I duplicated the main hex layer and changed the mode to "Multiply". I then darkened it a bit via contrast / brightness. Then I merged that layer down so I could color in the mismatched coastal hexes. I also corrected a problem where the automatic coast generation made some land tiles into water, opening up what should be a closed sea / bay on the west side of the map.

I also added a compass rose.

Up Next

Adding Settlements (and maybe some actual RPG content)

Saturday, December 10, 2022

Random Realm: Trimming the Map

I previously showed how I turned a map generated in Dwarf Fortress into something usable in a tabletop RPG game. At 250,948 square miles, the map that resulted is about 2.6 times the size of the UK, which is too large for a starting campaign. For this portion, I’m going to work on trimming the map down to a more manageable size and making it useful for actual gaming.

Step 4: Trim the Map(s)

Trimming the map is as simple as zooming in on a particular portion and cropping out the rest. Since I used a 24-mile hex scale previously, I can keep things at the same scale here. I’m not resizing things, I’m just cropping. Here’s the cropped map:

I chose this section based on the kind of terrain I thought would make for a fun campaign. I specifically wanted something temperate, with access to mountains, the sea, and not too many deserts. Deserts, to me, suggest a specific kind of campaign that’s different than standard D&D. Not to say that this will necessarily turn into bog-standard D&D, but I’m reasonably confident that I don’t want to run something with a lot of deserts.


Step 5: Convert to a Hex Map

I really like the look of the pretty map that the GIMP plugin created, but I find hex maps more useful on the GM side of the screen. My goal is to ultimately produce two maps: a graphically appealing fantasy map and a useful hex map.

To make a campaign hex map, I’m turning to yet another piece of software: Worldographer. One nice feature of this program is that it lets you drop an existing map onto a background layer to help decide where to place hexes representing the predominate terrain.

For that purpose, the original Dwarf Fortress ASCII map is actually a little more useful, because each of those ASCII symbols roughly translates into a specific type of terrain, which can in turn be represented by a single hex. The DF map, when cropped identically to the prettier map and dropped onto the Trace Underlay layer of Worldographer, looks like this:


After I add hexes for Terrain, the map looks something like this:


Next Steps

I’ll need to add more realistic coasts, terrain features like rivers, and make general improvements and tweaks to the campaign hex map.